I’m back! Already! Miss me? 😉
I love this time of year for “fancy dress season” reasons. As you may have guessed, I kept my tradition going and made yet another fancy thing for my office holiday party. Yay!
This year I went a somewhat stereotypical “holiday dress” route: velvet. Much like florals for spring, it’s hardly groundbreaking. 😉 I also decided early on to jump into Linda’s Designin’ December challenge once again, as I found an amazing inspiration dress a few years ago and couldn’t get it out of my head.

Image property of Linda @ Nice Dress! Thanks, I made it!!


Here’s my inspiration dress, which was part of Elie Saab’s Fall 2014 RTW collection:

Photo property of Vogue and/or their credited photographer(s)
Like I said, I first saw this a couple of years ago and it’s been in my head ever since! I knew I didn’t want to copy the exact style of the original dress, but 100% loved the draping, the color of the velvet, and the ombre effect. I found my dark teal poly/lycra stretch velvet at Fashion Fabrics Club and planned to dye the dress from the hem to the waist in a navy ombre; however, I couldn’t get the velvet to take the dye I bought (which was for synthetics). 😦 While I’m happy enough with the dress in one color, I definitely would have preferred it with the gradient effect that I envisioned!

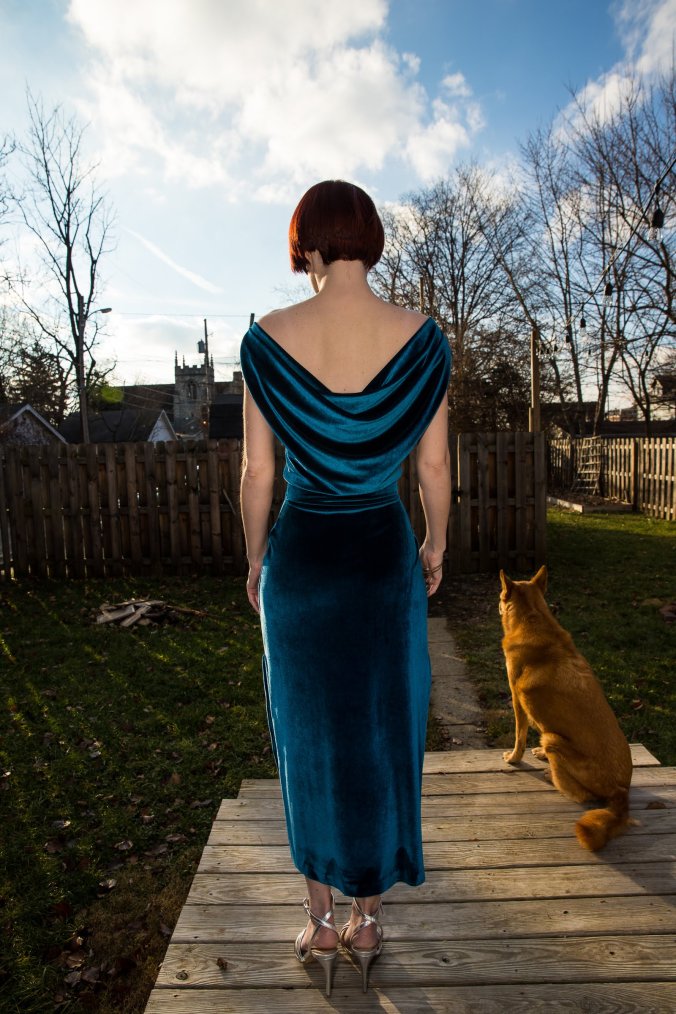
Full-length shot
The pattern I (mostly) used is Burda 05/2012 #133. (Julia Bobbin also made this pattern and she looked fierce!) I did make some changes, as follows:
- Adjusted the neckline: The pattern photos on Burda’s site are somewhat deceptive, as my mock-up per the pattern didn’t drop the back neckline as low as theirs. Then again, I kept my material on the straight grain rather than bias for the stretch factor. Anyway, I was determined to drop the back much lower. But after reworking the back bodice and starting from scratch using my moulage, it just wasn’t coming out how I envisioned. (To get the effect I was after, I’d most likely need to drape the dress onto a form.) In a last-ditch effort to get something with a little more “oomph” than the original design, I added an additional cowl extension to the Burda bodice that originated at the outermost edge of the shoulder; this dropped the shoulders to the off-the-shoulder position you see in these photos as well as added some additional “swag” draping to the back.
- Redesigned the shape of the bodice: The pattern bodice has a blouson effect, but I wanted things to be snug. (Not least of all because it would help the bodice stay up without the shoulders for support.) In the end I still could have taken a bit more out, but I had re-sewn it a few times (and had unpicked the waist once–that was not happening again!) and decided it was good enough. Plus I still had to be able to get into it with no zipper!!
- Redesigned the skirt: tiny pleats, in velvet, over my stomach? No thank you! Instead, I used the skirt pieces but eliminated the pleats and darts, and simply took the waist in until it was tight enough. I also lengthened the skirt to a midi (it’s now 34″ long, I think?) and added high splits to the sides. Originally I wasn’t sure about that last part, but when the back wasn’t dropping as low as I wanted they became necessary for some sex appeal.
- Omitted the zipper: Apart from being unnecessary with the stretch velvet, I wasn’t about the wrangle that sewing task on top of everything else! Just thinking about putting a zipper in this fabric gives me the willies…
- Omitted the ribbons: Even if I had kept the shoulders of the original design, I wasn’t about the have ribbons flapping around. Ick.
- Omitted the lining: Originally this was not my plan. But because I wanted the bodice tight and had zero-to-negative ease at the waist and no zipper, my lining fabric (silk jersey!!) wouldn’t have lent itself well to that choice. Self-lining was right out, because this fabric gets thick. So no lining.

The best shot of the back I have–it wouldn’t cooperate so well on “official photo” day!

The best available setting at the party…womp womp.
There’s clear elastic in the waist seam to help stabilize it. The bodice is still a bit long, due to the vertical stretch and weight/length of the skirt though. But doing that did help a lot! The hem and side splits are all hand-sewn, since visible stitching felt too casual for this dress.
The more eagle-eyed among you probably noticed an issue with the dress in the above full-length photos…I crushed the pile along the hem. 😦 I used a towel under the fabric when pressing, but it didn’t prevent tell-tale iron-shaped spots allllllllll along the hem. (Interestingly, I don’t appear to have done any damage with my first pass, in which the iron was laid parallel to the hem rather than perpendicular.) I was gutted when I noticed this, as you might imagine. I tried every available trick to un-crush the pile but nothing helped (just as the internet warned). The only good thing about this disaster is that it’s on the very bottom of the dress, which I doubt anyone paid as much attention to as the top! #smallmiracles ![]()
So that’s 2018’s holiday dress sorted! It wasn’t quite what I imagined but that happens, doesn’t it? I haven’t even started plotting for next year’s dress–who knows what I’ll end up with!
This ended up being my last project of 2018, so my next post will be a Top 5 post (Hits, Misses, and Highlights). See you there!
Special thanks to Linda for coordinating and hosting Designin’ December once again–it’s a pleasure to share alongside so many creative and inspiring pieces in that sewalong. ❤

It’s gorgeous!!
Thank you so much!
I’m so absolutely gaga over you in this dress. I didn’t even notice the hem-iron marks. I’m sure they’ll fluff out. You did an amazing job. Just stunning.
You are too sweet–thank you so much! I’m just pleased that it looks pretty good for a poly/lycra blend, haha!
Thank you for joining in! I hope you don’t mind I shared your photo on Instagram, giving your blog credit! Did you put it on Instagram too? This is lovely! I love velvet, but I am a bit afraid of it … if there is stretch or pile or? Oh my! You made a gorgeous dress out of it!
Oh I don’t mind at all, Linda–thank you so much for sharing my dress! I finally put a “proper” photo of it up on IG this morning. (I had envisioned a wonderful, artsy urban setting for my blog photos but had to settle for the back yard due to it being December in Ohio. 😉 ) And honestly sewing the velvet wasn’t bad at all except for the bulk from the pile and the tendency of it to shift a bit; the only part I had to hand-baste were the shoulder pleats to make sure they fell in the correct direction. Clearly I need to refine my pressing technique though, lol!
I’ll have to go take another look at IG again! 😁 December in Ohio doesn’t sound warm enough for fancy dress photos – but you did it! And you did a lovely job of working with the velvet!
Oh my word! Call the fire brigade because this dress is HOT HOT HOT and you look phenomenal in it! **lights cigarette, takes long drag**
Bahaha you are too funny AND kind, thank you! (And now that you mention it, this is the kind of dress where I could have used a long cigarette holder of my own! 😉 )
I love everything about this dress and you look absolutely stunning in it! Nice work!
Aww, thank you so much Lori! ❤
Stunning 😍😍😍😍
Thank you, Uta! ❤
This dress is stunning and you look fabulous in it! That back is so cool….
Thank you so much! I do love how the back turned out, even if it wasn’t as scandalously low as I wanted. 😉 (Plus it was a nice distraction from the “oops” on the hem!!)
I just love this dress! That back and those thigh slits add the right amount if sex appeal! And the color is to die for . . . Well not literally!! It is the perfect party dress. Have fun!!
Thank you, Paula! I was torn between this and another color–maybe my next velvet dress can be the other shade? 😉
Wowwww, gorgeous!!! You must have gotten tons of compliments!! I didn’t notice the hem thing at all, by the way. All your redesigning is so impressive. You really know what you’re doing!
Happy New Year!!!
Well thanks to the dress being velvet, I got compliments *and* pets! (Now I know how every cat I’ve ever met feels, LOL.) And I don’t know how much I know what I’m doing versus being lucky, but thank you so much! 😀
It’s beautiful!! I love the color of the velvet anf the bodice draping is stunning! Your iron mishap isn’t terribly noticeable (and much less severe than what I did to velvet with an iron earlier this year :0) – you can call it a design feature at the hem! and I didn’t notice it at all until you pointed it out!
Thank you, Alyssa! I hope you and your iron have both recuperated from your velvet incident–yikes! One good thing about the location of my “oops” is that there’s plenty else to look at on the dress before one gets to the hem, hehe. 😉
Pingback: Wednesday Weekly #152 – Helen's Closet